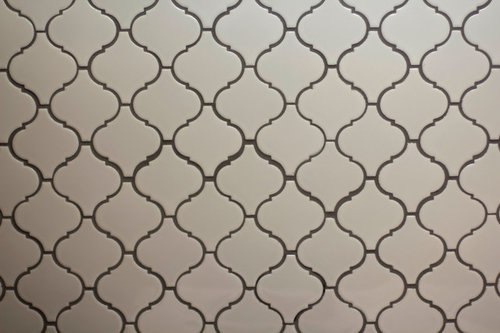
Moroccan Tile Backsplash Bad Spacing
I read through the reviews on Overstock and some people were talking about their installers using spacers while installing the tile. I didn't see him use any. Should he have? Is it the fault of the sheets of tiles not matching up well that there are some really large grout lines? Could he have fixed this during the installation? Also while reading the reviews, people talked about it taking a long time for their installers to put up. My installer had it all up on the wall, but not grouted, in four hours. It was 36 sq ft of tile that was installed. Did I get a rush job?
Comentarios (22)

TanCalGal
hace 10 añosProfessional tile guys I have hired are complete perfectionists. This looks like the work of a pretty good handyman?
hayleydaniels
hace 10 añosIf you've never laid tile, or be a part of doing it, you have no idea how labor intensive it can be, especially something like that. If the spacing is uneven on the backing, it's going to be incredibly difficult to seperate them, lay them one at a time [I'm assuming these are about the size of a quarter, if not smaller], and still get done in a reasonable time. Whether using a spacer would have changed that is beyond me. But I do know from havin helped tile a large floor area that it can be very slow, and if you have other commitments, it might be industry standard to slap the sheets up without spacers. I looked closely at the tile on Overstock.com, and each sheet would requre 42 spacers to properly hold them in place. That's a lot of tedious work if you aren't being paid by the hour.
Did you pay a flat fee for your installation, or are you paying by the hour? If it was a flat fee, he was allotted a specific amount of time to do the job, and if he goes over, I'm sure he'll hear about it from his boss.sapphireriver
Autor originalhace 10 añosThey are much bigger than a quarter. Each tile is about four inches long. It was a flat fee. And the boss was the person who was setting the tile. The written proposal that he gave me when he gave me the quote allocated 1-2 days for the job.
toats
hace 10 añosthe thing that sucks is that you okay'd the irregular spacing when he showed it to you....if i were you i would call the guy and cry. he will prob charge you less to fix it. but, i would fix it if its possible because if it bothers you now, it will always bother you.kathleen MK
hace 10 añosThe darker grout compounds the problem which was probably caused by the mesh spacing being off. It could be why the tile was overstock. Maybe a light color grout sealer/paint would camouflage the problem some. Will canisters or accessories hide it?hayleydaniels
hace 10 añosI was telling my husband about your situation as we'll be doing a backsplash next week now that our new countertop was installed today. We're using sheets of tile also so I asked him if he's going to put a spacer between each tile on the sheet, and what is recommended by the pros. He says that the only place they put spacers is between the sheets themselves, not between each individual tile, and this is stuff he's seen on videos by tiling pros as we're doing it ourselves.sapphireriver
Autor originalhace 10 añosThis area is over the stove, but not centered over it, so canisters won't work. I'm planning on hanging a large copper plate centered over the stove and it will cover about half the worst area that I show in the middle of the above photo. And the tile is same tile as the Merola tile Home Depot sells. I don't think the things Overstock sells is supposed to defective, so much as surplus.sapphireriver
Autor originalhace 10 añosWhen I asked my installer about the really wide grout lines he blamed those on the sheets themselves not lining up right.jessielynnlivingston
hace 10 añosHonestly, if the picture is of the worst part, it's really not bad! I would lighten the grout to match the tiles instead of contrasting them. If it still really bothers you, then consider a redo. They are beautiful tiles :) great choice!jonathan3
hace 10 añosOkay, this from a DIY first-time-backsplash-installer...alias newbie. We put the tiles up and they were perfect. Every time we moved down to work on the next section, it looked like the last section moved a little. They are very thick subway-style tiles. We worked for several hours on this project because we kept moving them back where they were originally placed. Don't laugh. They look pretty good. I wonder if these traveled while they were still wet. I hope you get this resolved to your satisfaction because you picked out beautiful tiles. PRO
PROCindy Sherman, CKBD
hace 10 añosjonathan3: There was one key point you made that explains your entire scenario, you moved DOWN. When you tile, especially heavy tiles or heavy-mosaics on a backing, you always move UP. You apply the first row, give it some time to set and move UP, otherwise you are literally allowing the weight of your mortar and tile to slide down your wall -- same issue if you tiled up too fast without allowing for drying time.m3459
hace 10 añosÚltima modificación: hace 10 añosNote to all those who are paying "professionals" to do tile work or any other: when a "professional" asks any question that starts with "are you okay with -------", that is an indication there is something they are noticing but hoping you are not, so they can blame your "instructions" to them when the job is finished and it looks like crap. But hey, they did a "job" and have your money.
auntiebuzzybee
hace 10 añosQUESTION: If wall is not flat and has a little raised area, for instance, these mesh backings spread over it and causes wider grout lines there, right?
I'm sorry you are disappointed. I know that kind of sinking feeling when it's just not what you'd envisioned. FWIW, I don't think it looks that bad but you are the one looking at it and paying for everything. Now it's that tough choice. Best wishes.fiskelove
hace 9 añosI love the tile!!!! I don't think I would have noticed the uneven spacing if you hadn't pointed it out.

custom_builder
hace 9 añosFor those of you that think that is anyway acceptable, you're every hack contractors dream come true. That particular style is easy to set and a simple cut with your knife through the mesh after they are installed is all that is needed for minor adjustments.
Wow, that's an eyesore. The poor gaps in the pic aren't the field tile within the sheets, it's the transition between sheets and adjustments should have been made. HD has numerous pics of DIY'rs successfully installing this type of tile.

bunnyllg
hace 9 añosJust use the same white as the tile for the grout and the discrepancies in spacing will be less noticeable. PRO
PROMyStyleTile Corp
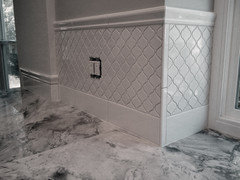
hace 9 años@custom_builder: I am a tile setter doing this for more then 30 years. Your picture shows great installation, however there is a dire mistake with the out-corner's layout. Every row on both sides of the out-corner need to have full tile matching with full tile and halfs matching with halfs for it to look proper, uniform, and professional.
patrinkac
hace 9 añosThe corner installation definitely was botched. And seems materials were in the costly zone....

Volver a cargar la página para no volver a ver este anuncio en concreto


Prava Design-Build